Portlet Level Configuration
With the configuration framework, you can set your application’s configuration for different levels of scope. Where Instance and Site-scoped configurations use ConfigurationProvider, portlet scoped configurations use PortletDisplay as shown in the example below.
The configuration framework can be used in conjunction with portlet preferences so that an app can have both a configuration UI in system settings as well a preference UI in the portlet’s setup tab.
Note, an application’s configuration is overridden if portlet preferences are implemented and set by a user. See Portlet Preferences to learn more.
See the Example Code
Start a new Liferay instance by running
docker run -it -m 8g -p 8080:8080 liferay/portal:7.4.3.132-ga132
Sign in to Liferay at http://localhost:8080. Use the email address test@liferay.com and the password test. When prompted, change the password to learn.
Then, follow these steps:
-
Download and unzip Sharing Localized Messages.
curl https://resources.learn.liferay.com/examples/liferay-x7y2.zip -Ounzip liferay-x7y2.zip -
From the module root, build and deploy.
./gradlew deploy -Ddeploy.docker.container.id=$(docker ps -lq)NoteThis command is the same as copying the deployed jars to
/opt/liferay/osgi/moduleson the Docker container. -
Confirm the deployment in the Liferay Docker container console.
STARTED com.acme.x7y2.web_1.0.0 [1651] -
Verify that the example module is working. Open your browser to
https://localhost:8080 -
Deploy the X7Y2 Portlet to a page. You can find the example portlet under Sample Widgets. Notice that the default color is set to green.
-
Navigate to Control Panel → Configuration → System Settings. At the bottom under the Other section, click on the X7Y2 configuration.
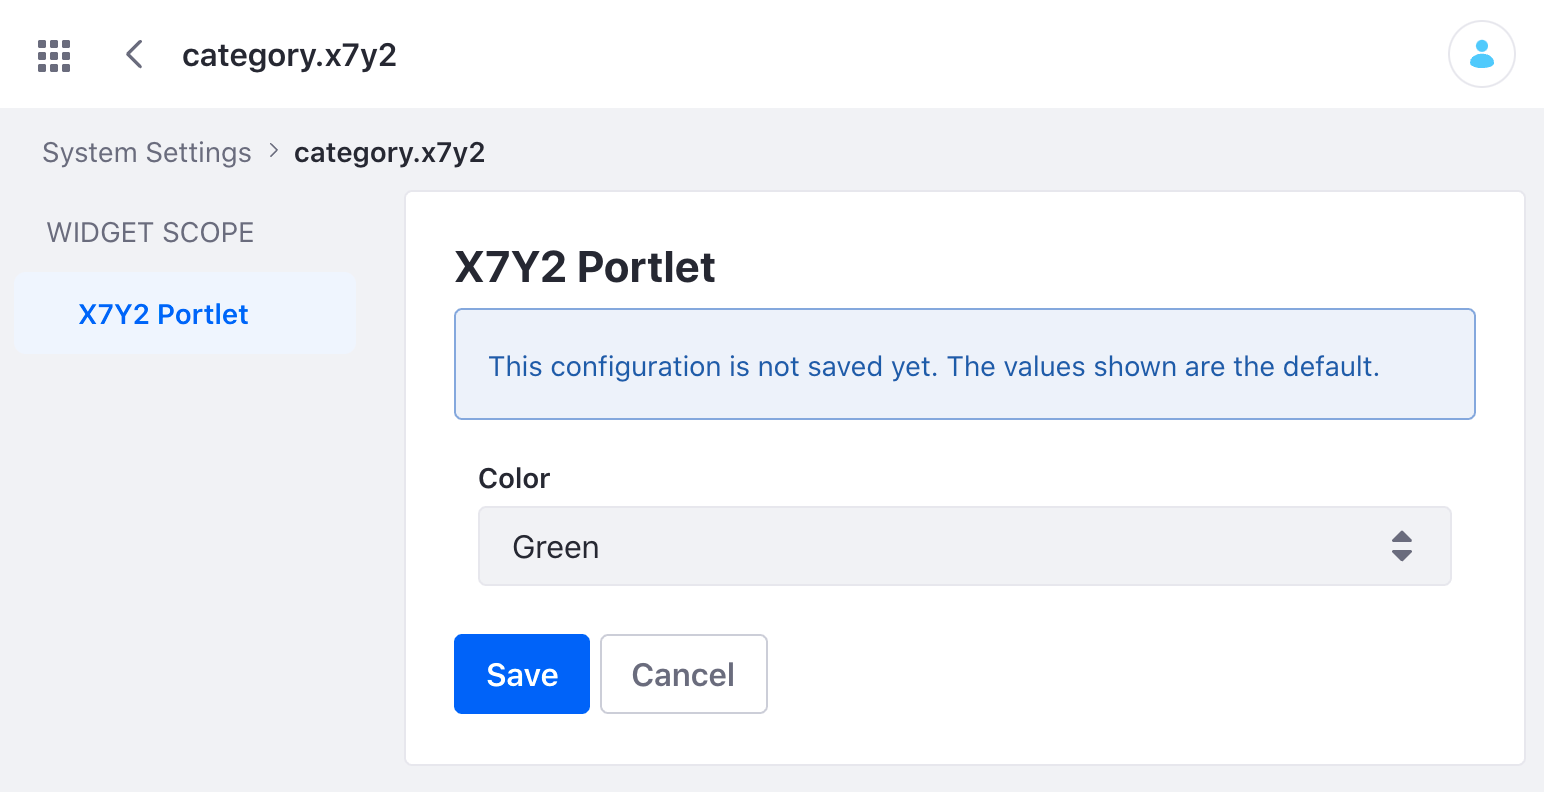
Select and save a different default color. Navigate back to the page with the deployed widget. The color variable is now updated.
-
Click the portlet’s options icon (
 ) in the widget header → Configuration. The portlet’s preferences window opens.
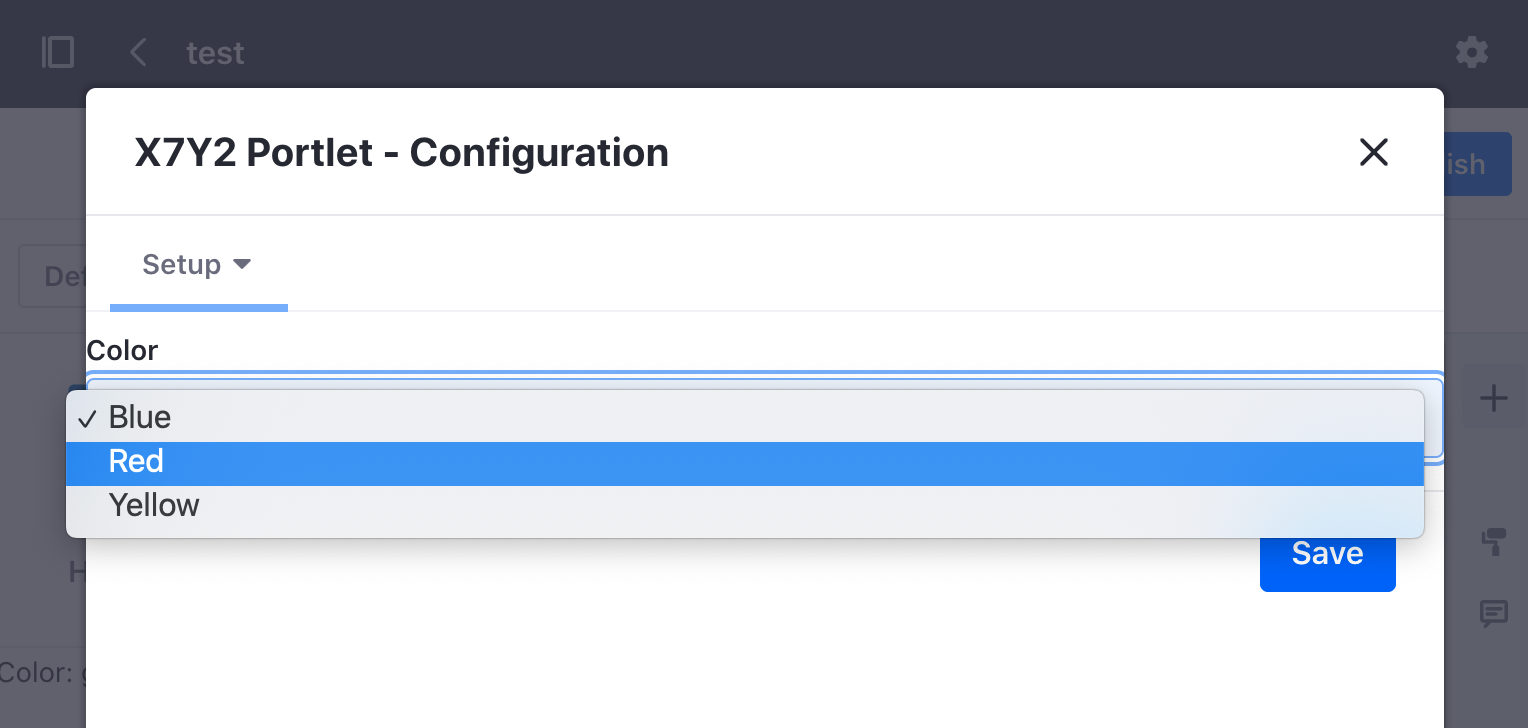 Note
NoteBefore Liferay DXP 2025.Q1/Portal GA132, the Configuration option appeared in the widget’s top-right corner.
Select and save a different color. Close the window and now the portlet preference appears. Note that the application configuration set in system settings is no longer shown after a portlet preference has been selected.
Let’s examine how the application’s configuration works together with portlet preferences.
Create the Configuration Interface
First create the configuration interface file that auto-generates the configuration UI in system settings.
@ExtendedObjectClassDefinition(
	category = "x7y2",
	scope = ExtendedObjectClassDefinition.Scope.PORTLET_INSTANCE
)
@Meta.OCD(
	id = "com.acme.x7y2.web.internal.configuration.X7Y2PortletInstanceConfiguration",
	name = "X7Y2 Portlet"
)
public interface X7Y2PortletInstanceConfiguration {

	@Meta.AD(
		deflt = "green", name = "color",
		optionLabels = {"Green", "Orange", "Purple"},
		optionValues = {"green", "orange", "purple"}, required = false
	)
	public String color();

}
In this example, the scope is set to PORTLET_INSTANCE. The interface also defines the configuration options available in the drop-down list.
Note that this example also works with scope set at higher levels (i.e. Site, Instance, system scope). A best practice is to mark an application that you intend to use with portlet preferences as portlet scope.
To learn more, see Creating the Configuration Interface.
A ConfigurationBeanDeclaration is required for Liferay versions before DXP 7.4 U51 or Portal 7.4 GA51. See ConfigurationBeanDeclaration with Previous Versions of Liferay.
Read the Configuration with PortletDisplay
Similar to reading configuration values from the Configuration Provider API, you can access the configuration values in your application with the Portlet Display API.
@Component(
	configurationPid = "com.acme.x7y2.web.internal.configuration.X7Y2PortletInstanceConfiguration",
	property = {
		"com.liferay.portlet.display-category=category.sample",
		"javax.portlet.display-name=X7Y2 Portlet",
		"javax.portlet.init-param.config-template=/configuration.jsp",
		"javax.portlet.init-param.view-template=/view.jsp",
		"javax.portlet.name=com_acme_x7y2_web_internal_portlet_X7Y2Portlet"
	},
	service = Portlet.class
)
public class X7Y2Portlet extends MVCPortlet {

	@Override
	public void render(
			RenderRequest renderRequest, RenderResponse renderResponse)
		throws IOException, PortletException {

		renderRequest.setAttribute(
			X7Y2PortletInstanceConfiguration.class.getName(),
			_getX7Y2PortletInstanceConfiguration(renderRequest));

		super.render(renderRequest, renderResponse);
	}

	private X7Y2PortletInstanceConfiguration
			_getX7Y2PortletInstanceConfiguration(RenderRequest renderRequest)
		throws PortletException {

		ThemeDisplay themeDisplay = (ThemeDisplay)renderRequest.getAttribute(
			WebKeys.THEME_DISPLAY);

		try {
			return _configurationProvider.getPortletInstanceConfiguration(
				X7Y2PortletInstanceConfiguration.class, themeDisplay);
		}
		catch (ConfigurationException configurationException) {
			throw new PortletException(configurationException);
		}
	}

	@Reference
	private ConfigurationProvider _configurationProvider;

}
The X7Y2PortletInstanceConfiguration method uses PortletDisplay to obtain the portlet instance configuration. The render() method adds the configuration to the request object so that it can be read from the request of the JSP file.
Set up Portlet Preferences
For the portlet to have portlet preferences, you must also add a configuration JSP file and configuration action to your application. To learn more about how these files work in a portlet, see Portlet Preferences.