oo

Configuring the DXP Cluster

You can run two docker containers to demonstrate a simple clustered environment. See Clustering for High Availability to learn more.

Configuring Elasticsearch for Each Node

  1. Navigate back to the same local folder (i.e. [your_folder]) where you set up Elasticsearch’s data volume. Create two new folders.

    mkdir -p liferay-1/files/osgi/configs liferay-2/files/osgi/configs
    
  2. Generate a configuration file for the liferay-1 node.

    cat <<EOT >> liferay-1/files/osgi/configs/com.liferay.portal.search.elasticsearch6.configuration.ElasticsearchConfiguration.config
    operationMode="REMOTE"
    transportAddresses="elasticsearch:9300"
    clusterName="LiferayElasticsearchCluster"
    EOT
    
  3. Generate a configuration file for the liferay-2 node.

    cat <<EOT >> liferay-2/files/osgi/configs/com.liferay.portal.search.elasticsearch6.configuration.ElasticsearchConfiguration.config
    operationMode="REMOTE"
    transportAddresses="elasticsearch:9300"
    clusterName="LiferayElasticsearchCluster"
    EOT
    

Deploying Each Cluster Node

  1. Find the IP address of the elasticsearch and some-mariadb containers.

    docker network inspect bridge
    

    Replace [IP address] below with the respective IP address of elasticsearch and some-mariadb.

  2. Start the first Liferay node.

    docker run -it \
       --add-host elasticsearch:[IP address] \
       --add-host some-mariadb:[IP address] \
       -e LIFERAY_JDBC_PERIOD_DEFAULT_PERIOD_JNDI_PERIOD_NAME="" \
       -e LIFERAY_JDBC_PERIOD_DEFAULT_PERIOD_DRIVER_UPPERCASEC_LASS_UPPERCASEN_AME=org.mariadb.jdbc.Driver \
       -e LIFERAY_JDBC_PERIOD_DEFAULT_PERIOD_URL="jdbc:mariadb://some-mariadb:3306/dxp_db?useUnicode=true&characterEncoding=UTF-8&useFastDateParsing=false" \
       -e LIFERAY_JDBC_PERIOD_DEFAULT_PERIOD_USERNAME=root \
       -e LIFERAY_JDBC_PERIOD_DEFAULT_PERIOD_PASSWORD=my-secret-pw \
       -e LIFERAY_CLUSTER_PERIOD_LINK_PERIOD_ENABLED=true \
       -e LIFERAY_CLUSTER_PERIOD_LINK_PERIOD_CHANNEL_PERIOD_LOGIC_PERIOD_NAME_PERIOD_CONTROL=control-channel-logic-name-1 \
       -e LIFERAY_CLUSTER_PERIOD_LINK_PERIOD_CHANNEL_PERIOD_LOGIC_PERIOD_NAME_PERIOD_TRANSPORT_PERIOD_NUMBER0=transport-channel-logic-name-1 \
       -e LIFERAY_CLUSTER_PERIOD_LINK_PERIOD_AUTODETECT_PERIOD_ADDRESS=some-mariadb:3306 \
       -e LIFERAY_WEB_PERIOD_SERVER_PERIOD_DISPLAY_PERIOD_NODE=true \
       -e LIFERAY_DL_PERIOD_STORE_PERIOD_IMPL=com.liferay.portal.store.db.DBStore \
       --name liferay-1 \
       -p 11311:11311 \
       -p 8009:8009 \
       -p 8080:8080 \
       -v $(pwd)/liferay-1:/mnt/liferay \
       liferay/portal:latest
    
  3. Start the second Liferay node.

    docker run -it \
       --add-host elasticsearch:[IP address] \
       --add-host some-mariadb:[IP address] \
       -e LIFERAY_JDBC_PERIOD_DEFAULT_PERIOD_JNDI_PERIOD_NAME="" \
       -e LIFERAY_JDBC_PERIOD_DEFAULT_PERIOD_DRIVER_UPPERCASEC_LASS_UPPERCASEN_AME=org.mariadb.jdbc.Driver \
       -e LIFERAY_JDBC_PERIOD_DEFAULT_PERIOD_URL="jdbc:mariadb://some-mariadb:3306/dxp_db?useUnicode=true&characterEncoding=UTF-8&useFastDateParsing=false" \
       -e LIFERAY_JDBC_PERIOD_DEFAULT_PERIOD_USERNAME=root \
       -e LIFERAY_JDBC_PERIOD_DEFAULT_PERIOD_PASSWORD=my-secret-pw \
       -e LIFERAY_CLUSTER_PERIOD_LINK_PERIOD_ENABLED=true \
       -e LIFERAY_CLUSTER_PERIOD_LINK_PERIOD_CHANNEL_PERIOD_LOGIC_PERIOD_NAME_PERIOD_CONTROL=control-channel-logic-name-2 \
       -e LIFERAY_CLUSTER_PERIOD_LINK_PERIOD_CHANNEL_PERIOD_LOGIC_PERIOD_NAME_PERIOD_TRANSPORT_PERIOD_NUMBER0=transport-channel-logic-name-2 \
       -e LIFERAY_CLUSTER_PERIOD_LINK_PERIOD_AUTODETECT_PERIOD_ADDRESS=some-mariadb:3306 \
       -e LIFERAY_WEB_PERIOD_SERVER_PERIOD_DISPLAY_PERIOD_NODE=true \
       -e LIFERAY_DL_PERIOD_STORE_PERIOD_IMPL=com.liferay.portal.store.db.DBStore \
       --name liferay-2 \
       -p 11312:11311 \
       -p 9009:8009 \
       -p 9080:8080 \
       -v $(pwd)/liferay-2:/mnt/liferay \
       liferay/portal:latest
    
  4. You can now visit each node. Liferay-1 is available at http://localhost:8080. And Liferay-2 is available at http://localhost:9080.

    The two nodes can be accessed locally.

note

Running two Liferay docker nodes may require increasing your default CPU and memory resource settings.

Testing the Cluster

In a cluster, as content is created or modified in one node, it should be available across other nodes. Create a simple blog post to see this in action.

  1. In the Liferay-1 node (i.e. http://localhost:8080), open the Product Menu (Product Menu). Click Blogs under Content & Data.

  2. Click Add (Add icon).

  3. Add the following entry.

    • Title: Foo
    • Content: Bar

    Click Save.

  4. Switch over to the Liferay-2 node (i.e. http://localhost:9080). Open the Product Menu (Product Menu). Click Blogs under Content & Data.

  5. The blog entry created in the Liferay-1 node is visible in the Liferay-2 node.

    The blog entry created in the other node is visible.

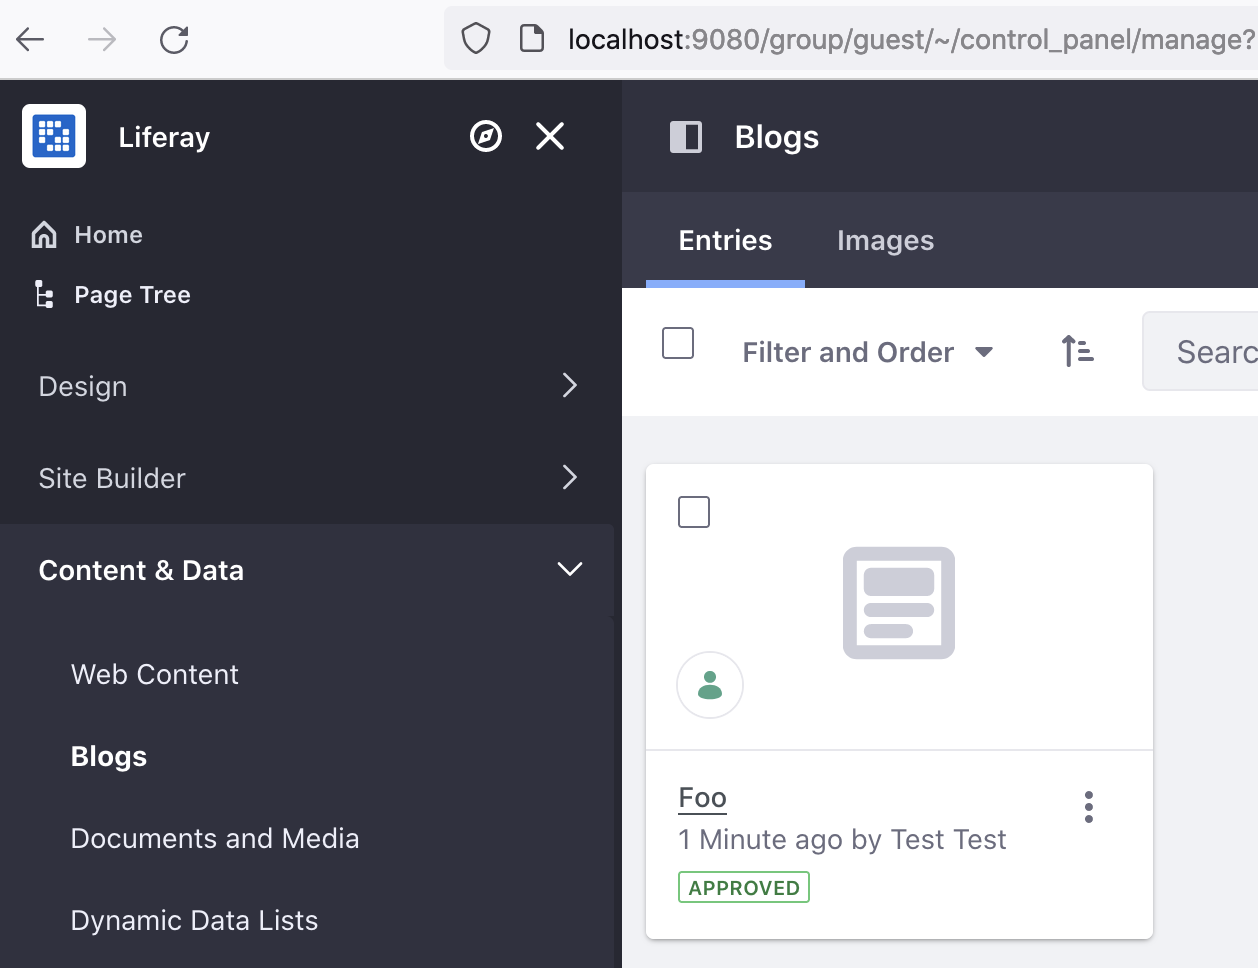
Your Liferay environment is now configured as a clustered environment. Note that the next step, load balancing your nodes, is out of scope for this course, as it’s configured outside of Liferay. You have completed this module on clustering.

Relevant Concepts