This article outlines what Microsoft Azure is, how to create a Virtual Machine (VM) to run on the Liferay platform and how to configure the Liferay platform with Azure.
Resolution
What is Azure?
Microsoft Azure is a cloud computing platform and infrastructure created by Microsoft. It is used for building, deploying, and managing applications and services through a global network of Microsoft managed datacenters. It provides both PaaS (Platform as a Service) and IaaS (Infrastructure as a Service) services and supports many different programming languages, tools and frameworks; including both Microsoft-specific and third-party software and systems.
Creating a Virtual Machine
- Log in to Azure.
- On the main menu, click on the Virtual Machines tab

- Click on Add
- Select the operating system (OS) or database server (the example in the screenshot shows Ubuntu)

- Click Create
Proceed through the configuration screens to set the name of the VM, user credentials and VM specs (users might have to create a Resource Group if none are available to choose)
- Follow the instructions here: Manage Azure resources through portal to create a new Resource Group
What is a resource group?
A Resource Group is a container that holds related resources for an application. The resource group could include all of the resources for an application, or only those resources that are logically grouped together. - When it comes to the size of the VM to run a Liferay bundle, the optimal size is at least 2 cores and 8GB RAM. The closest option is the D2_V2 Standard. Users are always free to use other options for larger number of cores and use more RAM based on their needs.
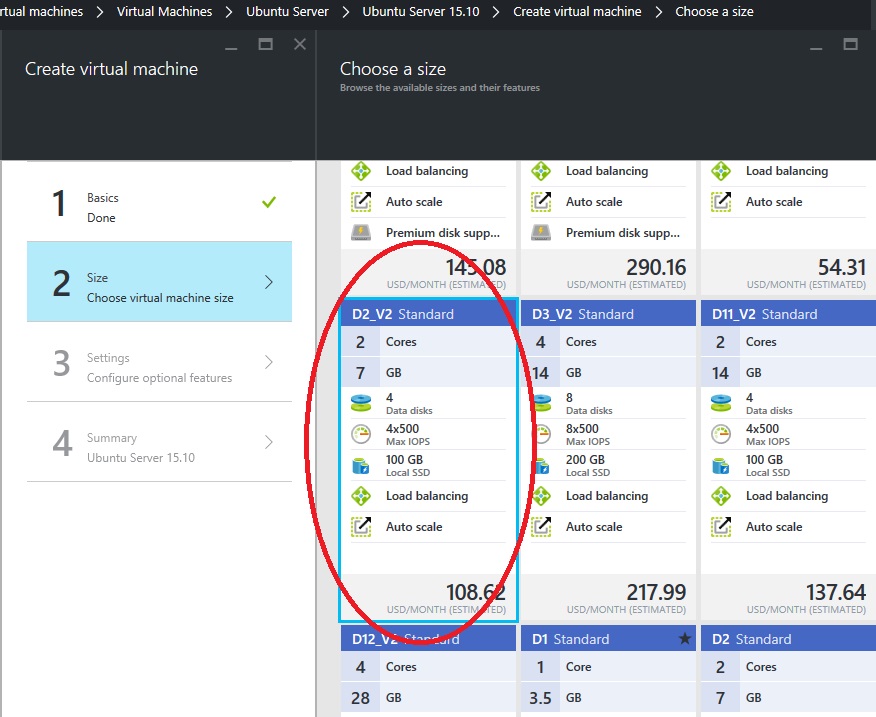
- Proceed to the next step: leave default values on the Settings screen. Click OK once satisfied with the configuration.
Configuring the Liferay Bundle
For the best results, make changes to the portal by creating the portal-ext.properties (do not modify portal.properties). Place the portal-ext.properties file in the ROOT\WEB-INF\classes directory for the Liferay platform to detect changes. The application server should be shut down first before configuring the portal.
Azure Files
Users have the option to mount files and share them by using the File Share function. Once a mounted file share directory has been created, enter the following in the portal-ext.properties:
dl.store.file.system.root.dir=
with the location the mounted file share directory.
Azure File Share uses the SMB protocol so no other changes are necessary.
Known Issue:
CentOS 6.x does not work with Azure Files because the CIFS driver in this version of Linux does not support SMB 2.1+. There will be a "Host is down error." For more information, you can read Introducing Microsoft Azure File Service.
Azure SQL Databases
All databases created under the SQL databases tab will be SQL Server. For other types of databases, create the databases under Virtual Machines.
Note: Users cannot use the default open source jtds.jar provided in the Liferay bundle. Instead, users must use the official Microsoft driver available on Download Microsoft JDBC Driver for SQL Server.
As a result, use the following JDBC properties in the portal-ext.properties:
jdbc.default.driverClassName=com.microsoft.sqlserver.jdbc.SQLServerDriver
jdbc.default.url=jdbc:sqlserver://hubertgeorge.database.windows.net:1433;database=${yourdatabasename}
jdbc.default.username=sa
jdbc.default.password=password
Be sure to update the URL and database name.
Additional Information
Liferay Support does not recommend or endorse specific third-party products over others. Liferay is not responsible for any instructions herein or referenced regarding these products. Any implementation of these principles is the responsibility of the subscriber.