Using Object Data with React Charts
Here you’ll use Objects, Headless APIs, and custom element remote applications to create a dynamic chart for data dashboards. First, you’ll set up a new DXP instance with CORS enabled for Object API calls. Then, you’ll create an Object for receiving and storing data. After adding data to the Object using REST APIs, you’ll download and build the provided React FusionCharts application. Once the code is compiled, you’ll host the generated .js file in the Liferay Document Library and copy its WebDAV URL. Finally, you’ll use this URL to create a remote app for the React chart and deploy it as a Page widget.
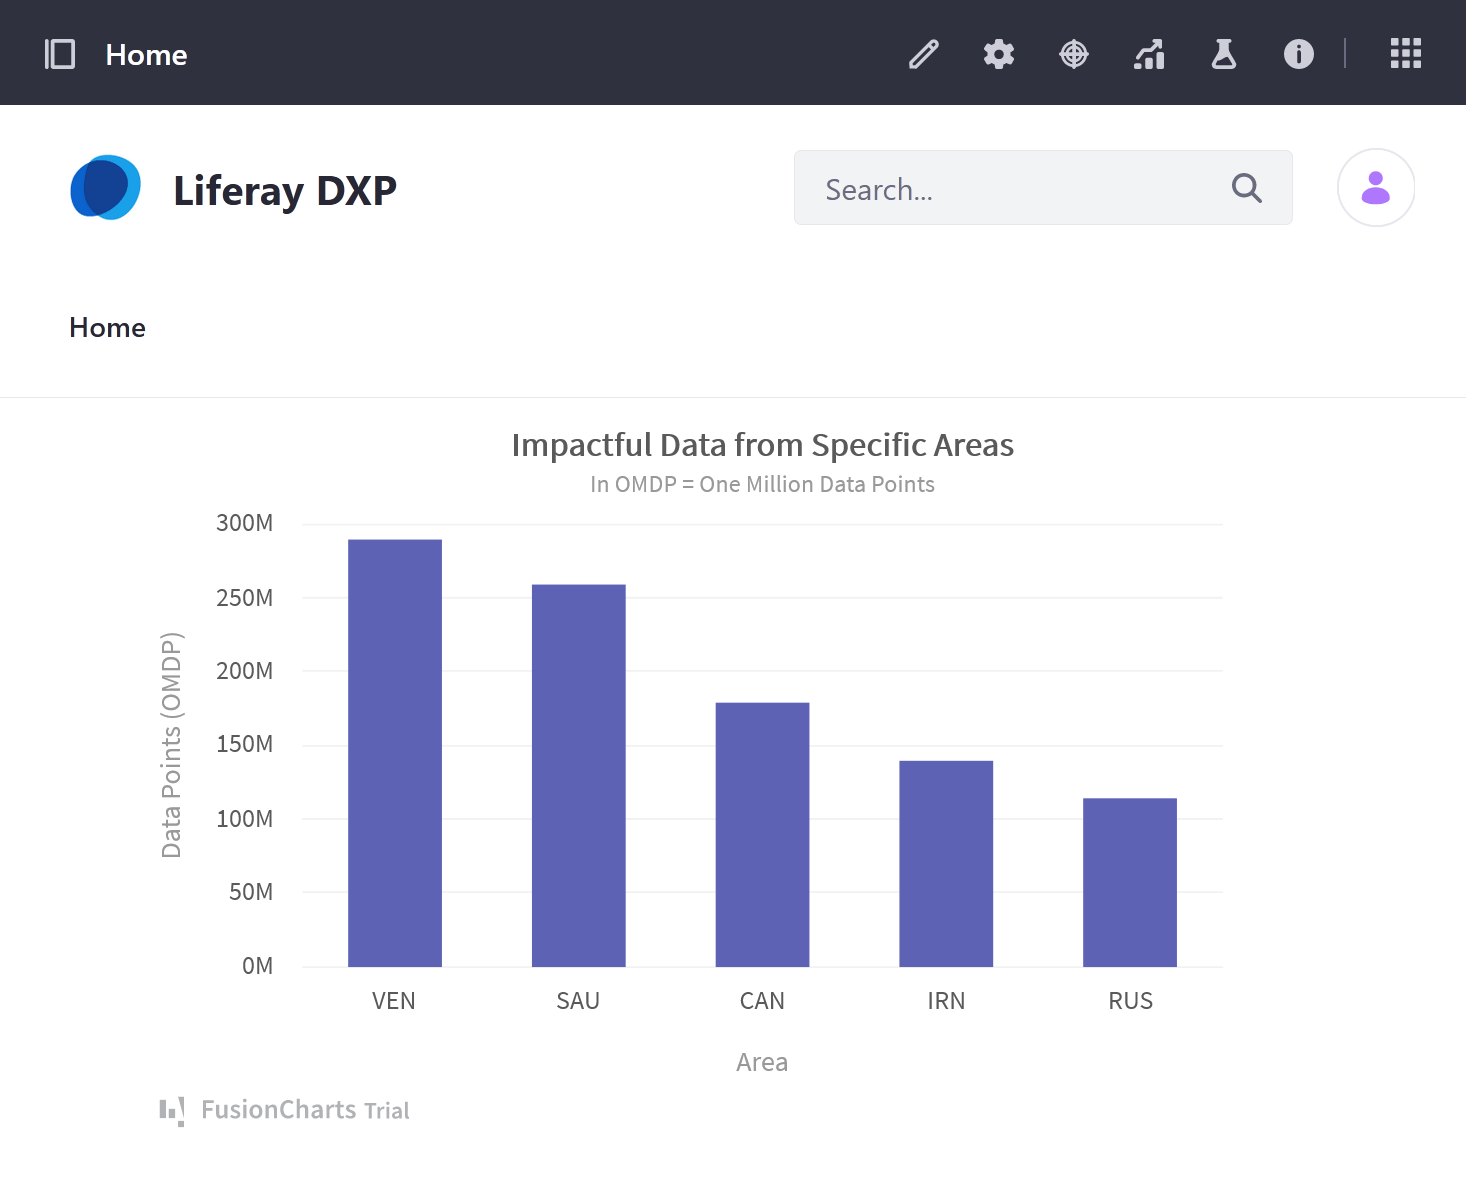
The chart is configured to call the Object via Headless API every five seconds, which returns the Object’s data and updates the chart dynamically.
Setting Up Liferay DXP
Start a new Liferay DXP instance by running
docker run -it -m 8g -p 8080:8080
Sign in to Liferay at http://localhost:8080 using the email address test@liferay.com and the password test. When prompted, change the password to learn.
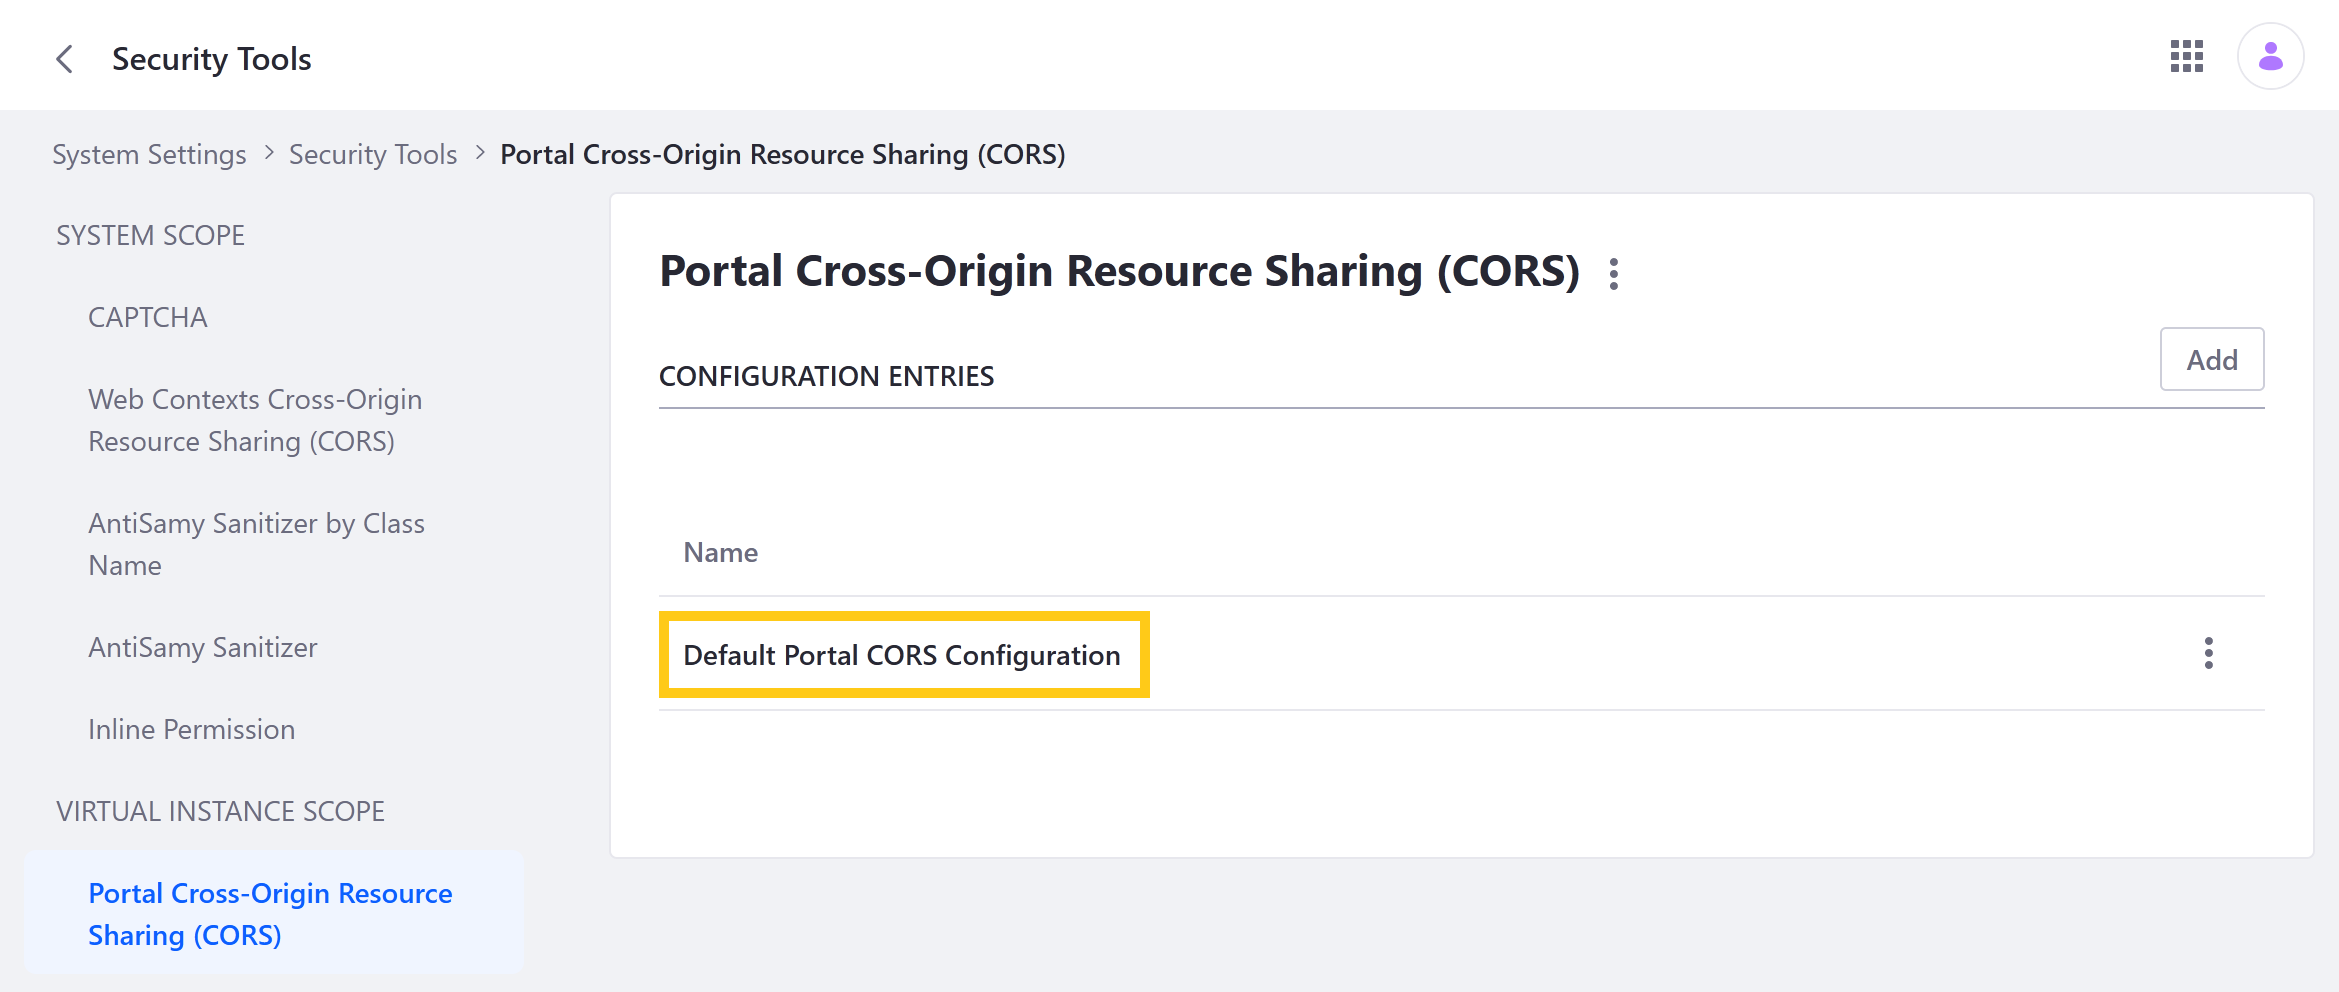
Then, follow these steps to add the /o/c/* URL pattern to the Default Portal CORS Configuration:
Open the Global Menu (
 ), go to the Control Panel tab, and click Security Tools.
Go to the Portal Cross-Origin Resource Sharing (CORS) tab and click Default Portal CORS Configuration.
Add a URL Pattern with the
/o/c/*value and click Save. This enables CORS for all Object APIs.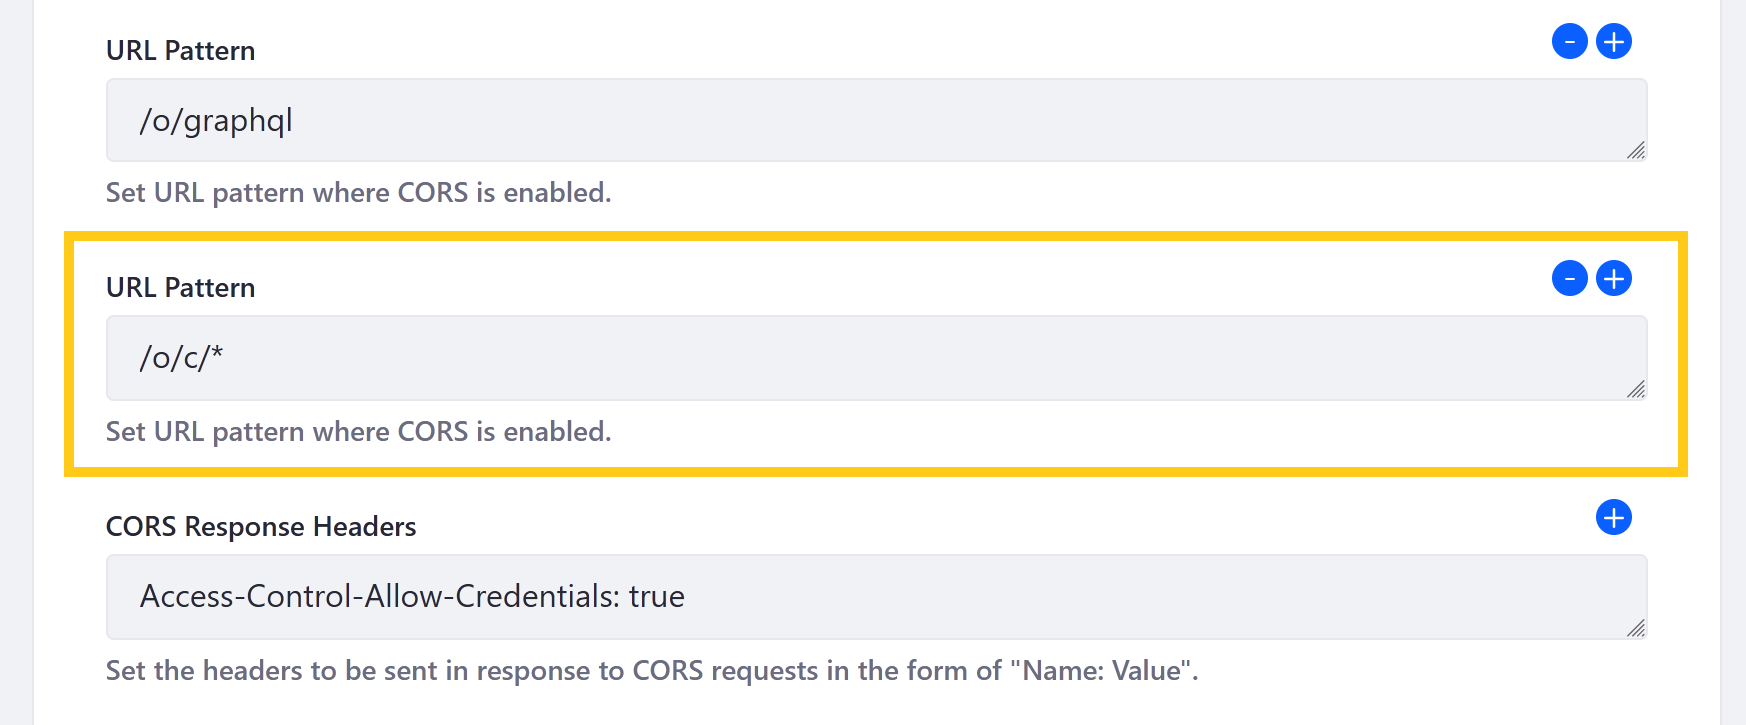
Creating an Object for the React Chart
Open the Global Menu (
), go to the Control Panel tab, and click Objects.Click the Add button (
 ) and enter these values:
Field Value Label X3J8-Object Plural Label X3J8-Objects Name X3J8Object noteThe provided React app uses these values.
Select the new Object draft, click the Field tab, and add these fields:
Label Field Name Type Required Label label Text ✔ Value value Integer ✔ Click the Details tab and click Publish.
Publishing an Object creates and activates a new application for receiving and storing data. You can now access it via the Liferay UI or Headless APIs.
Adding Data to the Object using Headless APIs
Open Liferay’s API Explorer (i.e.,
localhost:8080/o/api), click the REST Applications drop-down menu, and click c/x3j8objects.Enter this data into the request body for the batch
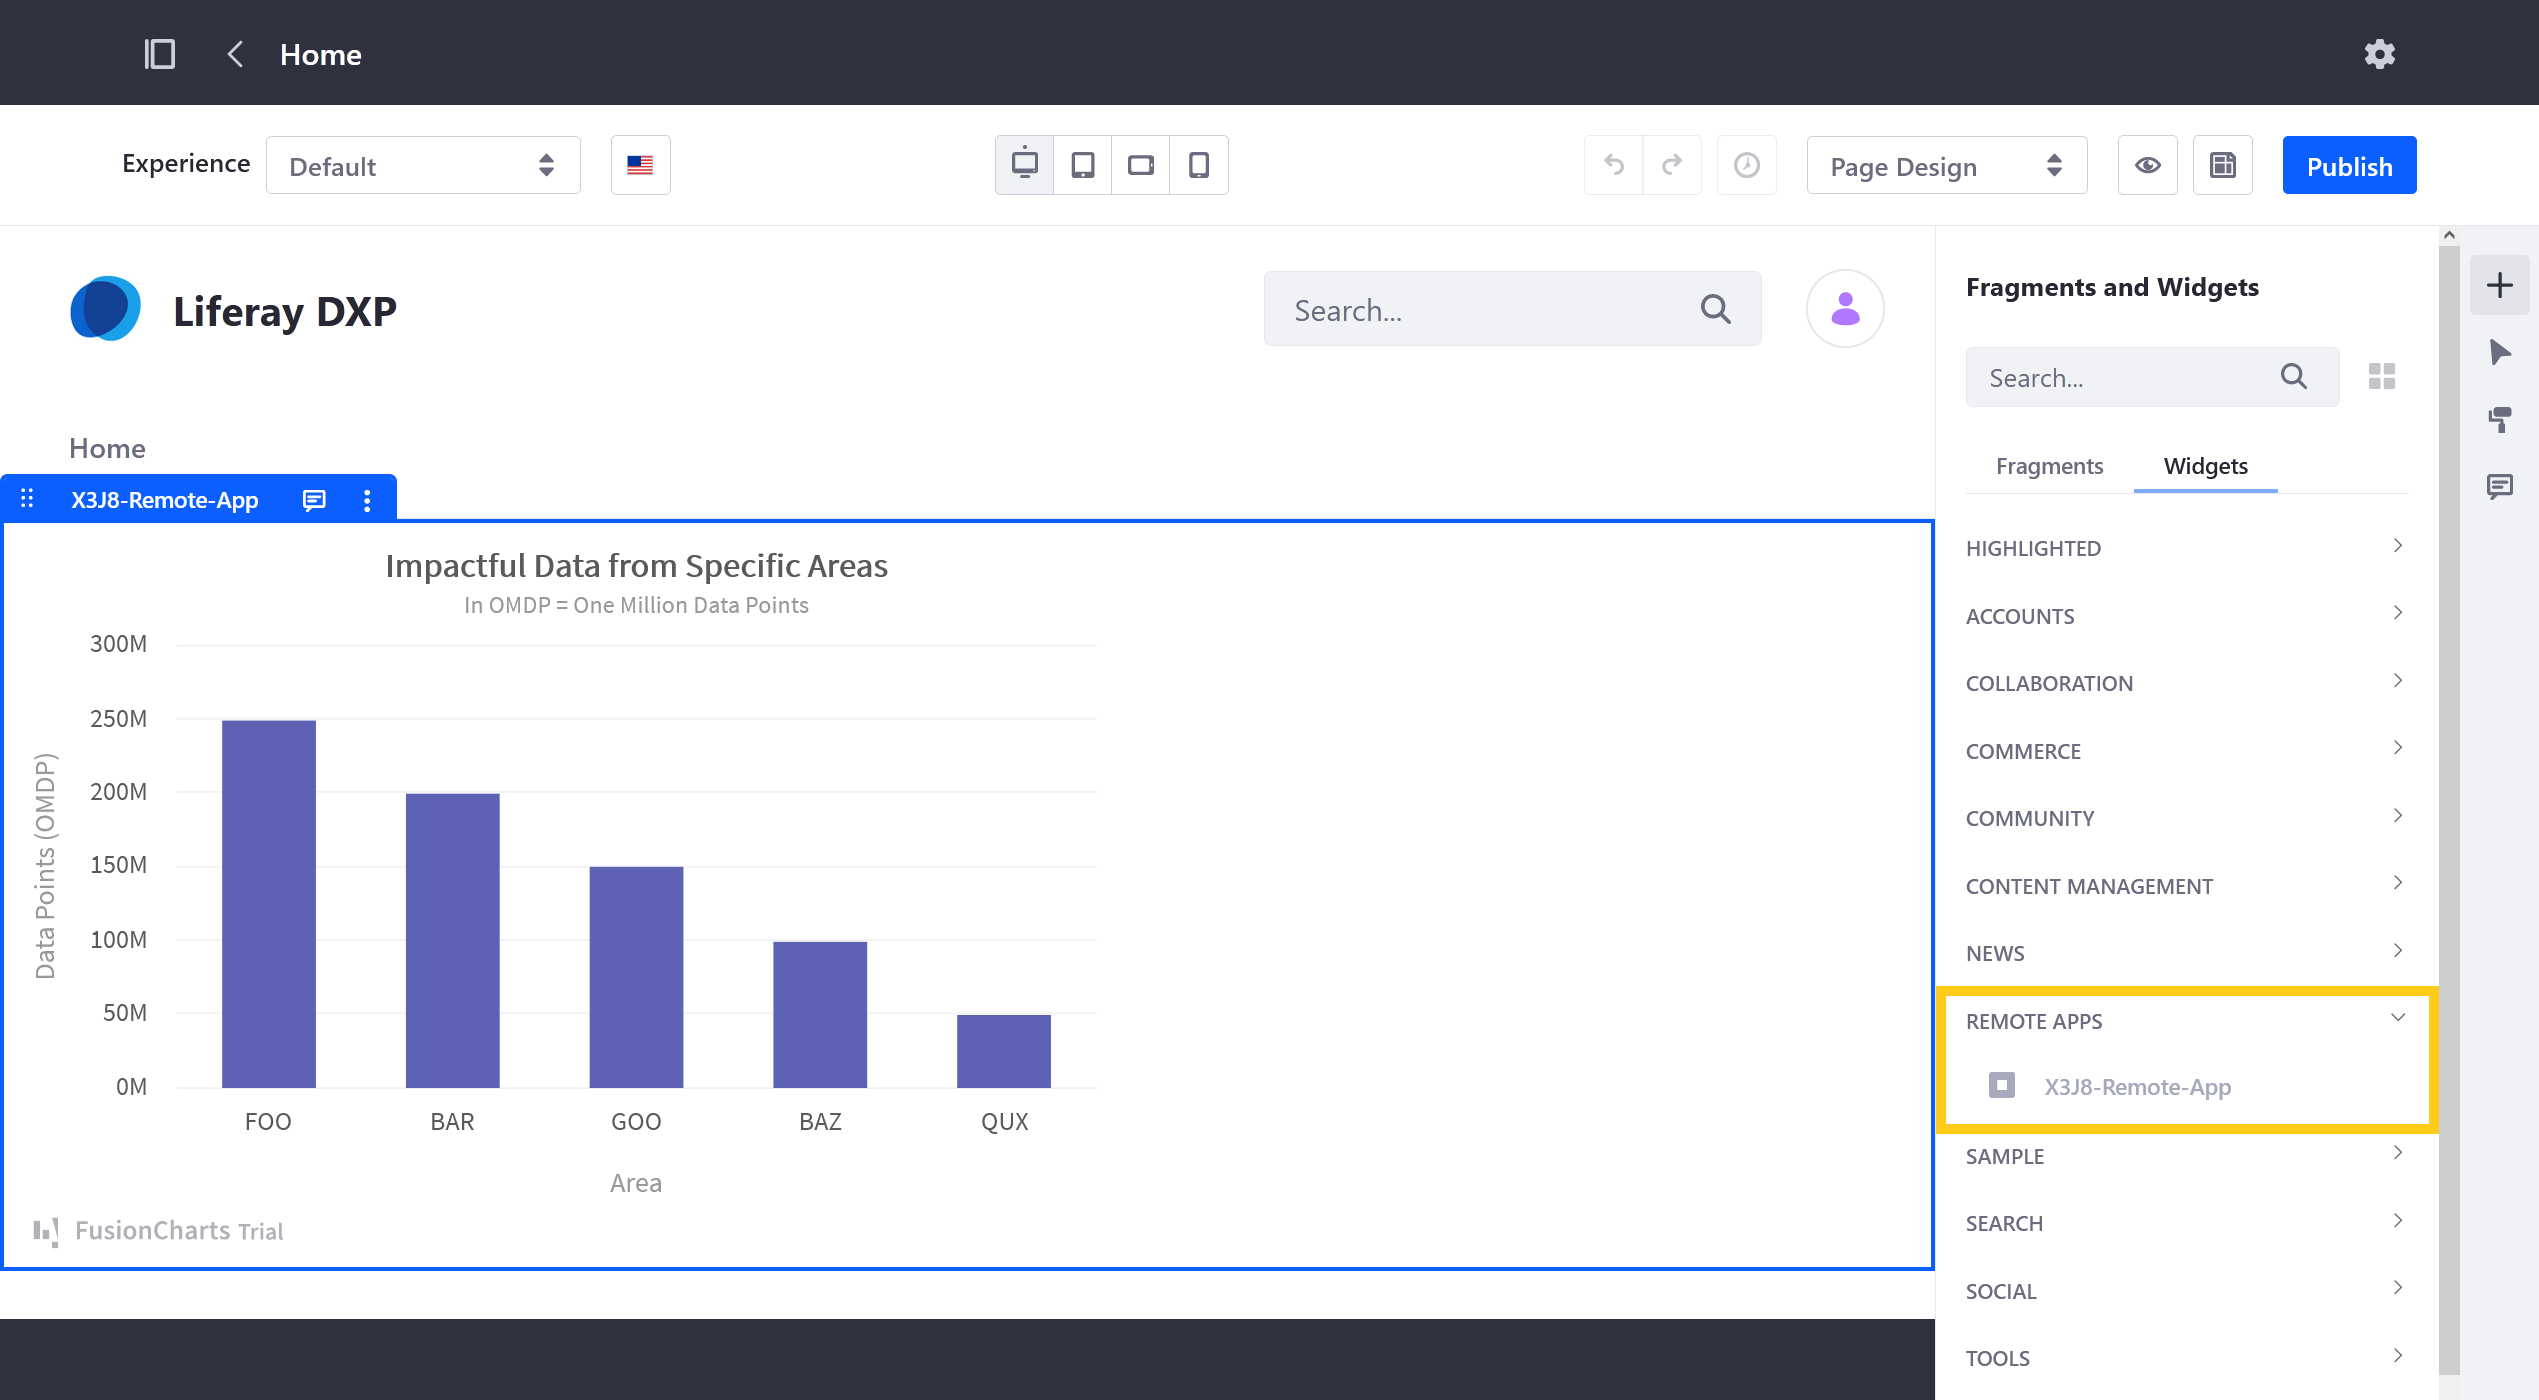
POSTAPI:[ { "label": "FOO", "value": "250" }, { "label": "BAR", "value": "200" }, { "label": "GOO", "value": "150" }, { "label": "BAZ", "value": "100" }, { "label": "QUX", "value": "50" } ]Click Execute to add the data entries to the Object.
Once you’ve finished adding data, you can set up the provided React server. This includes a FusionChart implementation that makes API calls to X3J8-Object and displays its data.
Setting Up the React Chart
Follow these steps to download and build the React application:
Download and unzip the React project.
curl https://resources.learn.liferay.com/dxp/latest/en/liferay-development/building-applications/liferay-x3j8.zip -Ounzip liferay-x3j8.zipcd liferay-x3j8Verify you have
nodeandyarninstalled. If you don’t, run the following command and follow the prompts:./setup_tutorial.shNavigate to the React application’s folder and start the React server.
cd x3j8-custom-elementyarn startOnce started, go to
localhost:3000to view the React chart. It calls thec/x3j8objectsservice using Basic Authentication and retrieves the Object’s data every five seconds.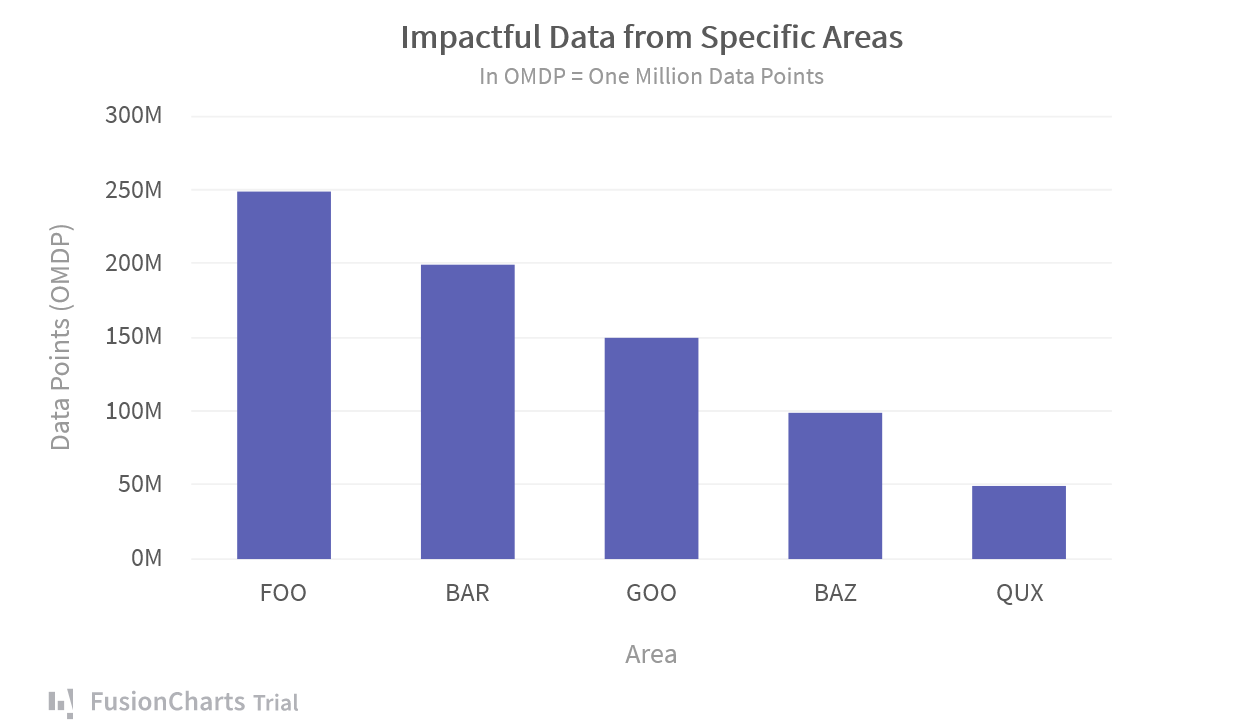
Build the React project.
yarn buildThis command creates an optimized production build, which includes the files necessary for running the application as a remote app.
Verify the build is successful and take note of the application’s
.jsfile.Creating an optimized production build... Compiled successfully. File sizes after gzip: 523.77 kB build/static/js/main.5a6819d5.js 20 B build/static/css/main.31d6cfe0.cssnoteThe
.cssfile is unnecessary for this tutorial.
Once the code is compiled, you can host the application’s .js file in the Liferay Document Library and copy its WebDAV URL.
Hosting the Application’s .js File
Open the Site Menu (
 ), expand Content & Data, and click Documents and Media.
Drag and drop the
.jsfile into the upload area.When uploaded to the Document Library, the file is assigned a unique WebDAV URL, which you’ll use to create the remote app.
Click the Info icon (
 ) and select the uploaded file.
Copy the file’s WebDAV URL and save it for use in the next step.
For example,
http://localhost:8080/webdav/guest/document_library/main.5a6819d5.js.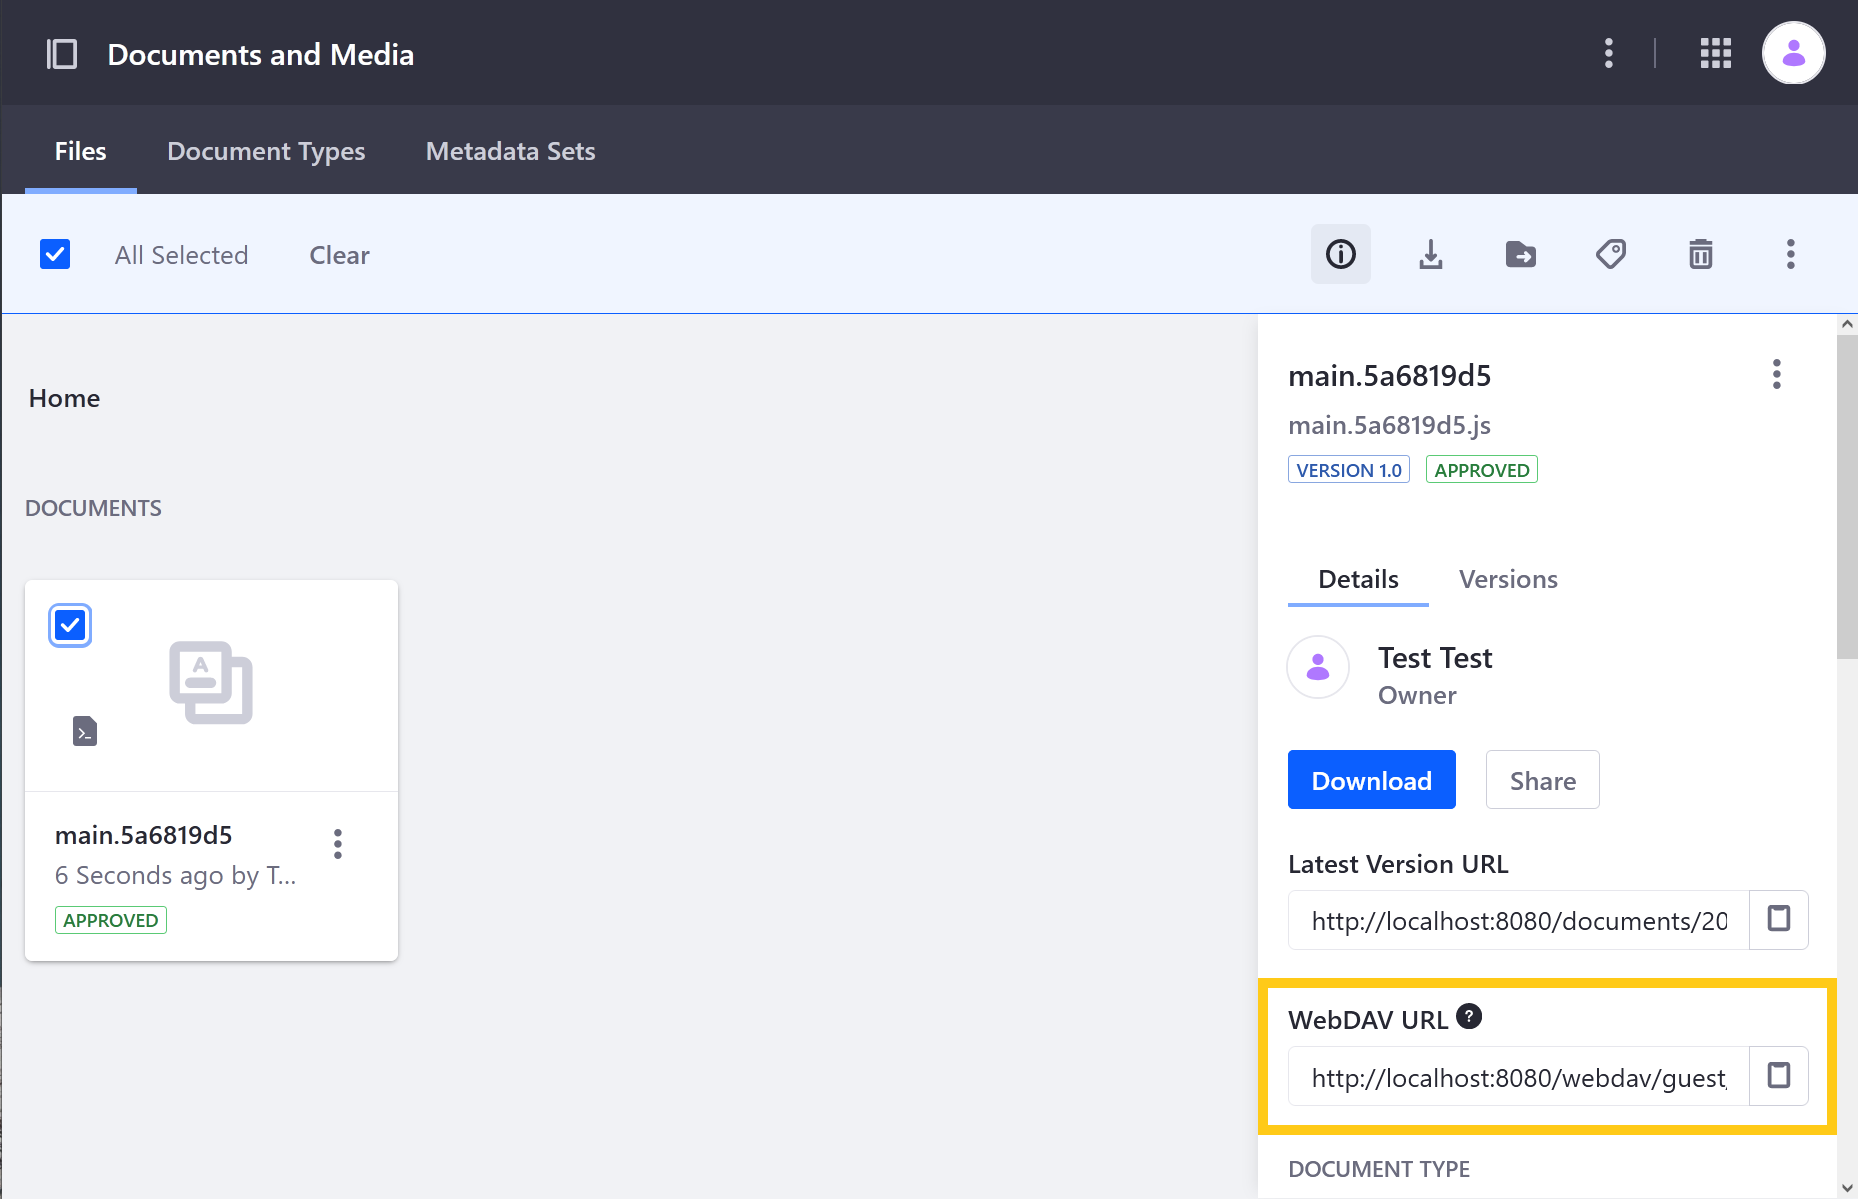
Creating a Remote App for the React Chart
Open the Global Menu (
), click the Applications tab, and select Remote Apps.Click the Add button (
).Enter these values:
Field Value Name X3J8-Custom-Element Type Custom Element HTML Element Name x3j8-custom-elementURL WebDAV URL for the .jsfilePortlet Category Name Remote Apps Click Save.
Once Saved, Liferay creates a widget for the remote app that you can deploy to Site Pages. This widget is listed under the application’s Portlet Category Name (i.e., Remote Apps for this tutorial).