Consuming REST Services
Liferay DXP contains REST services for most of its applications. These services are fully OpenAPI compliant. Here, learn how to consume them. This takes only three steps:
-
Identify the service you wish to consume.
-
Identify the site containing the data you need.
-
Make the service call using credentials that have access to the data.
This example uses Docker image with a fresh install of Liferay DXP.
Identify the Service to Consume
You need a running Liferay DXP to call its REST services.
Start a new Liferay instance by running
docker run -it -m 8g -p 8080:8080 liferay/portal:7.4.3.112-ga112
Sign in to Liferay at http://localhost:8080. Use the email address test@liferay.com and the password test. When prompted, change the password to learn.
To view the various API endpoints, use your browser and access Liferay’s API Explorer at [server]:[port]/o/api. For example, in your Docker instance, you can find them here:
http://localhost:8080/o/api
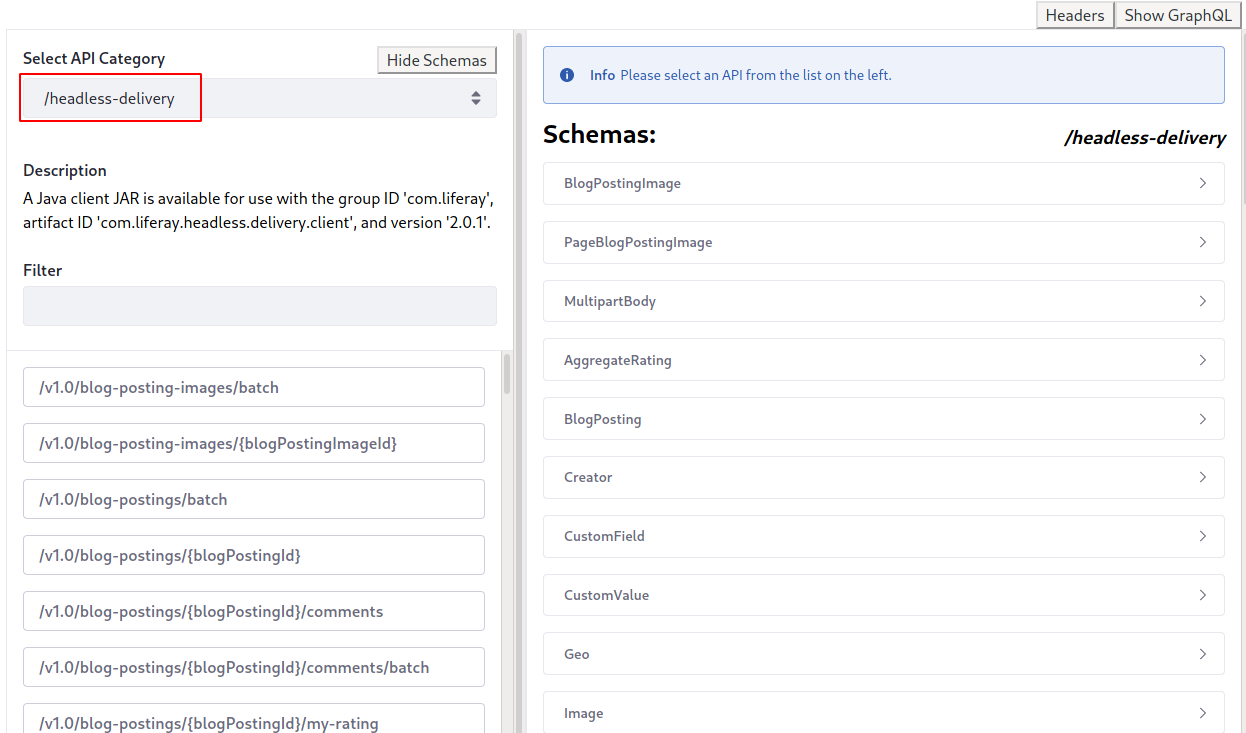
APIs are divided into several categories. This example uses the BlogPosting service to retrieve blog posts from the Blogs widget, but you can use this procedure with any of the published services.
-
Select the Headless Delivery category. This category contains the
BlogPostingservice. You can use the filter to search for services. -
Click the Show Schemas button, and on the right side of the screen a list of all the schemas in this category appears.
-
Keep a browser tab open to the schema browser; when you want to PUT a
BlogPosting, use its schema.
REST Context Paths for Root Models
Liferay DXP 2024.Q3+/Portal 7.4 GA132+
When working with object definitions related to modifiable system objects, the REST context path includes the root model’s path. This reflects the hierarchical relationship between models and helps organize API endpoints efficiently.
Note that some root models are grouped under a common namespace and must be preceded by a prefix representing that namespace. This prefix typically reflects the module or functional area of the system.
For example, the APIApplication root model is part of the API Builder component. All of its endpoints are found under the headless-builder prefix. Similarly, Commerce-related functionalities are under the headless-commerce-admin prefix.
You can find this information using Liferay’s API Explorer. Click on Rest Applications (1) in the top-right corner. The REST applications appear with their corresponding paths, including prefixes if applicable (2). You can confirm the path under Servers (3).
Example context paths:
-
With a prefix:
APIApplicationis the root model andAPIEndpointis its descendant, making the REST endpointsFor
APIApplication:/headless-builder/application.For
APIEndpoint:/headless-builder/applications/endpoints. -
Without a prefix:
Some REST API endpoints are not grouped under a namespace and therefore don’t use prefixes.
For example,
CommerceReturnis the root model andCommerceReturnItemis its descendant, making the REST endpointsFor
CommerceReturn:/commerce-returns.For
CommerceReturnItem:/commerce-returns/commerce-return/items.
The table below lists modifiable system objects and their corresponding REST context paths. Use this information to understand how to construct REST context paths when working with modifiable system objects.
| Object Definition | REST Context Path |
|---|---|
APIApplication | /headless-builder/applications |
APIEndpoint | /headless-builder/endpoints |
APIFilter | /headless-builder/filters |
APIProperty | /headless-builder/properties |
APISchema | /headless-builder/schemas |
APISort | /headless-builder/sorts |
Bookmark | /bookmarks |
CommerceReturn | /commerce-returns |
CommerceReturnItem | /commerce-return-items |
FDSAction | /data-set-manager/actions |
FDSCardsSection | /data-set-manager/cards-sections |
FDSClientExtensionFilter | /data-set-manager/client-extension-filters |
FDSDateFilter | /data-set-manager/date-filters |
FDSDynamicFilter | /data-set-manager/dynamic-filters |
FDSEntry | /data-set-manager/entries |
FDSField | /data-set-manager/fields |
FDSListSection | /data-set-manager/list-sections |
FDSSort | /data-set-manager/sorts |
FDSView | /data-set-manager/views |
FunctionalCookieEntry | /functional-cookies-entries |
NecessaryCookieEntry | /necessary-cookies-entries |
PerformanceCookieEntry | /performance-cookies-entries |
PersonalizationCookieEntry | /personalization-cookies-entries |
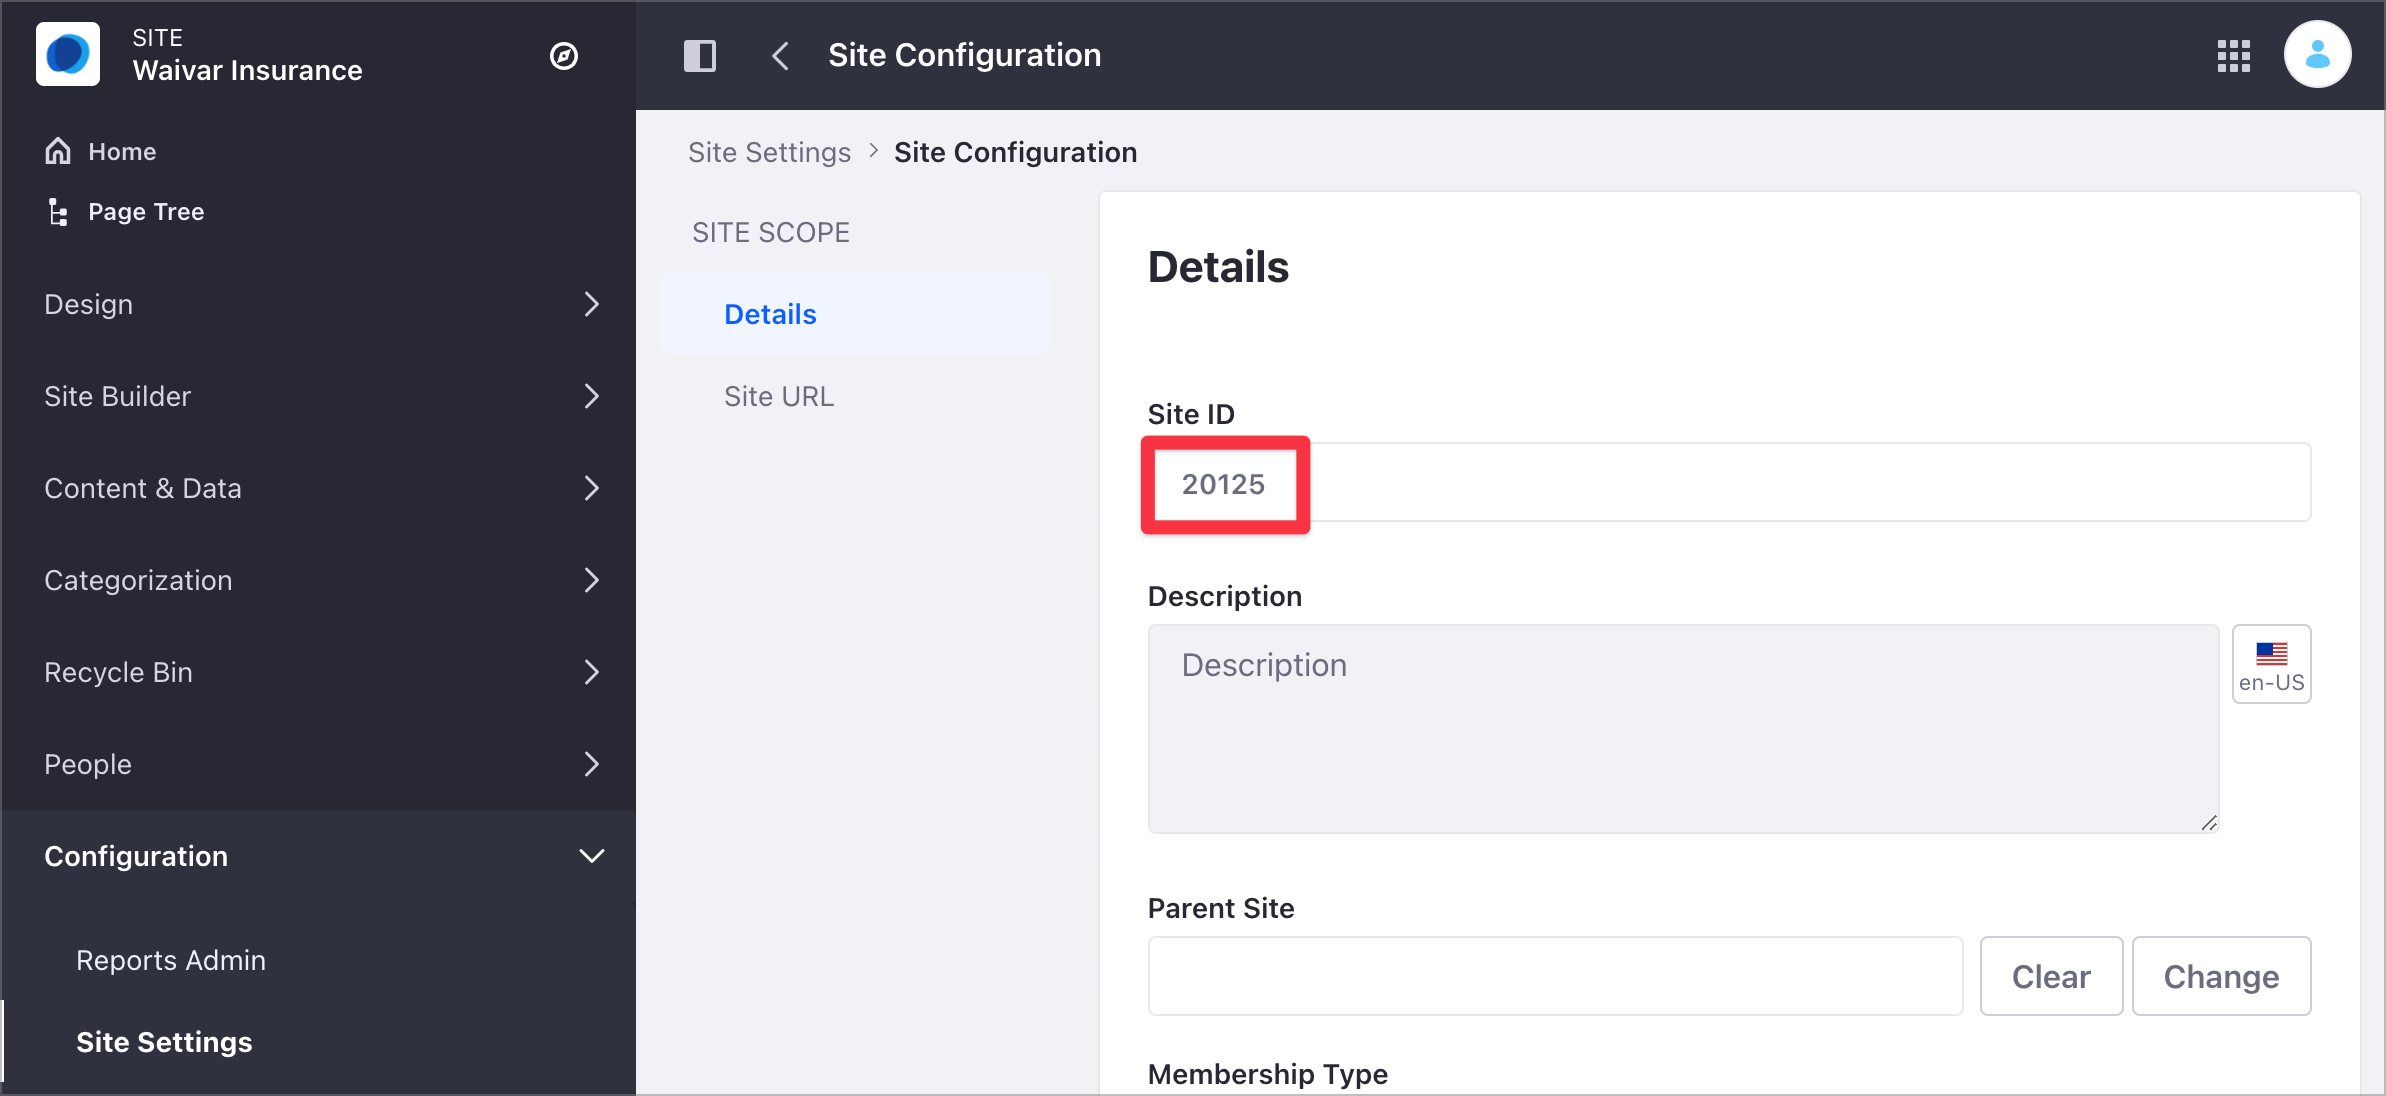
Identify the Site Containing the Data
Now you must find the default Site ID:
-
Open the Site menu (
 ) and go to Configuration → Site Settings.
 -
Under the Platform section, click Site Configuration. For Liferay DXP versions 7.3 and earlier, click the General tab.
-
Find the Site identifier under Site ID.
Make the Service Call Using Credentials with Access to the Data
Now you have everything needed to make the call. All web services must be accessed using credentials that grant access to the data you’re requesting. The simplest method is Basic Auth, which passes credential data in the URL. Since this method is insecure, use it only during development. For production, your application should authorize users via OAuth2.
The examples below use cURL.
Calling a Service Using Basic Auth (During Development Only)
To call a service using Basic Auth, provide the credentials in the URL:
curl "http://localhost:8080/o/headless-delivery/v1.0/sites/20122/blog-postings/" -u 'test@liferay.com:learn'
Calling a Service Using OAuth2
For production, create an OAuth2 application and use the OAuth2 process to get an authorization token. Once you have the token, provide it in the HTTP header:
curl -H "Authorization: Bearer d5571ff781dc555415c478872f0755c773fa159" http://localhost:8080/o/headless-delivery/v1.0/sites/20122/blog-postings
Getting and Posting Data
If you run the query above to get all blog postings, you see there aren’t any:
{
   "actions" : {
      "subscribe" : {
         "method" : "PUT",
         "href" : "http://localhost:8080/o/headless-delivery/v1.0/sites/{siteId}/blog-postings/subscribe"
      },
      "unsubscribe" : {
         "method" : "PUT",
         "href" : "http://localhost:8080/o/headless-delivery/v1.0/sites/{siteId}/blog-postings/unsubscribe"
      },
      "create" : {
         "method" : "POST",
         "href" : "http://localhost:8080/o/headless-delivery/v1.0/sites/{siteId}/blog-postings"
      }
   },
   "items" : [ ],
   "lastPage" : 1,
   "page" : 1,
   "pageSize" : 20,
   "totalCount" : 0
}
First, post a blog entry.
Posting a Blog Entry
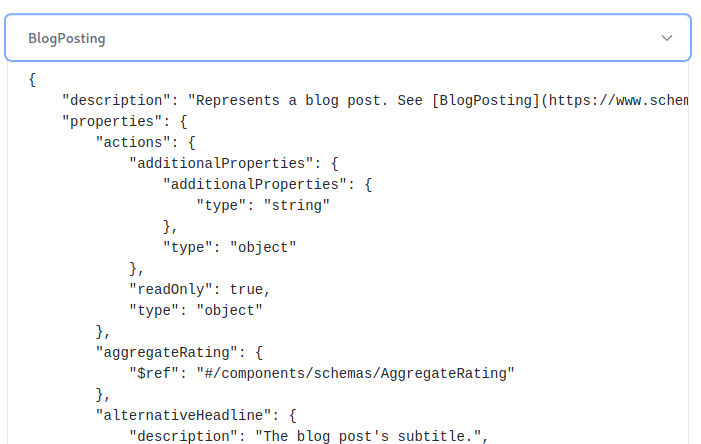
You can use the schema browser to learn how to post a blog entry.

-
Go back to your browser tab containing the schema browser. On the right side, click the
BlogPostingentry to display its schema (see above). This shows the whole data structure for aBlogPosting, but there are only two required fields:articleBodyheadline
-
Construct a simple JSON document to post a blog entry:
{ "headline": "Test Blog Entry from REST Services", "articleBody": "This article was posted via REST services provided by Liferay DXP." } -
Make the request:
curl --header "Content-Type: application/json" --request POST --data '{ "headline": "Test Blog Entry from REST Services", "articleBody": "This article was posted via REST services provided by Liferay DXP." }' http://localhost:8080/o/headless-delivery/v1.0/sites/20122/blog-postings -u test@liferay.com:learn
Liferay DXP returns the full JSON representation of your blog entry:
{
   "actions" : {
      "get" : {
         "method" : "GET",
         "href" : "http://localhost:8080/o/headless-delivery/v1.0/blog-postings/{blogPostingId}"
      },
      "replace" : {
         "method" : "PUT",
         "href" : "http://localhost:8080/o/headless-delivery/v1.0/blog-postings/{blogPostingId}"
      },
      "update" : {
         "method" : "PATCH",
         "href" : "http://localhost:8080/o/headless-delivery/v1.0/blog-postings/{blogPostingId}"
      },
      "delete" : {
         "method" : "DELETE",
         "href" : "http://localhost:8080/o/headless-delivery/v1.0/blog-postings/{blogPostingId}"
      }
   },
   "alternativeHeadline" : "",
   "articleBody" : "This article was posted via REST services provided by Liferay DXP.",
   "creator" : {
      "additionalName" : "",
      "contentType" : "UserAccount",
      "familyName" : "Test",
      "givenName" : "Test",
      "id" : 20125,
      "name" : "Test Test",
      "profileURL" : "/web/test"
   },
   "customFields" : [ ],
   "dateCreated" : "2020-03-06T18:02:26Z",
   "dateModified" : "2020-03-06T18:02:27Z",
   "datePublished" : "2020-03-06T18:02:00Z",
   "description" : "",
   "encodingFormat" : "text/html",
   "friendlyUrlPath" : "test-blog-entry-from-rest-services",
   "headline" : "Test Blog Entry from REST Services",
   "id" : 35215,
   "keywords" : [ ],
   "numberOfComments" : 0,
   "relatedContents" : [ ],
   "siteId" : 20122,
   "taxonomyCategories" : [ ]
}
Getting All Blog Entries
Now you can repeat the first query you did to see that the blog entry you posted is there:
curl "http://localhost:8080/o/headless-delivery/v1.0/sites/20122/blog-postings/" -u 'test@liferay.com:learn'
This returns a list of blog entries. The entry you added is the only one in the list:
{
   "actions" : {
      "subscribe" : {
         "method" : "PUT",
         "href" : "http://localhost:8080/o/headless-delivery/v1.0/sites/{siteId}/blog-postings/subscribe"
      },
      "unsubscribe" : {
         "method" : "PUT",
         "href" : "http://localhost:8080/o/headless-delivery/v1.0/sites/{siteId}/blog-postings/unsubscribe"
      },
      "create" : {
         "method" : "POST",
         "href" : "http://localhost:8080/o/headless-delivery/v1.0/sites/{siteId}/blog-postings"
      }
   },
   "items" : [ {
      "actions" : {
         "get" : {
         "method" : "GET",
         "href" : "http://localhost:8080/o/headless-delivery/v1.0/blog-postings/{blogPostingId}"
         },
         "replace" : {
         "method" : "PUT",
         "href" : "http://localhost:8080/o/headless-delivery/v1.0/blog-postings/{blogPostingId}"
         },
         "update" : {
         "method" : "PATCH",
         "href" : "http://localhost:8080/o/headless-delivery/v1.0/blog-postings/{blogPostingId}"
         },
         "delete" : {
         "method" : "DELETE",
         "href" : "http://localhost:8080/o/headless-delivery/v1.0/blog-postings/{blogPostingId}"
         }
      },
      "alternativeHeadline" : "",
      "articleBody" : "This article was posted via REST services provided by Liferay DXP.",
      "creator" : {
         "additionalName" : "",
         "contentType" : "UserAccount",
         "familyName" : "Test",
         "givenName" : "Test",
         "id" : 20125,
         "name" : "Test Test",
         "profileURL" : "/web/test"
      },
      "customFields" : [ ],
      "dateCreated" : "2020-03-06T18:02:26Z",
      "dateModified" : "2020-03-06T18:02:27Z",
      "datePublished" : "2020-03-06T18:02:00Z",
      "description" : "",
      "encodingFormat" : "text/html",
      "friendlyUrlPath" : "test-blog-entry-from-rest-services",
      "headline" : "Test Blog Entry from REST Services",
      "id" : 35215,
      "keywords" : [ ],
      "numberOfComments" : 0,
      "relatedContents" : [ ],
      "siteId" : 20122,
      "taxonomyCategories" : [ ]
   } ],
   "lastPage" : 1,
   "page" : 1,
   "pageSize" : 20,
   "totalCount" : 1
}
Getting a Single Blog Entry
Each time you’ve made a request, Liferay DXP has returned other possible endpoints. One of these is to get a single blog entry by its ID. If you know your entry’s ID, you can retrieve it:
curl "http://localhost:8080/o/headless-delivery/v1.0/blog-postings/35215" -u test@liferay.com:learn
This returns the same blog entry.
Deleting a Blog Entry
If you know its ID, you can also delete your blog entry:
curl -X DELETE "http://localhost:8080/o/headless-delivery/v1.0/blog-postings/35215" -u test@liferay.com:learn
In this case, nothing is returned, but you can verify your entry is gone by requesting it as you did above:
curl "http://localhost:8080/o/headless-delivery/v1.0/blog-postings/35215" -u test@liferay.com:learn
Liferay DXP then returns this JSON document in response:
{
  "status" : "NOT_FOUND",
  "title" : "No BlogsEntry exists with the primary key 35215"
}
Congratulations! You’ve now learned how to call Liferay DXP’s REST services. Remember that the examples above use Basic Auth: for production, use OAuth2 to call services in a secure way.