Creating a Condition Evaluator
A Workflow condition node uses a Groovy script to determine the proper transition a workflow item traverses. Instead of writing logic in Groovy directly in a workflow definition <script> element, you can deploy Java logic by implementing the ConditionEvaluator interface.
- Write the Java implementation.
- Call the Java class from the workflow definition XML file.
First deploy and observe a working ConditionEvaluator.
Deploy a Condition Evaluator
Start a new Liferay instance by running
docker run -it -m 8g -p 8080:8080 liferay/portal:7.4.3.112-ga112
Sign in to Liferay at http://localhost:8080. Use the email address test@liferay.com and the password test. When prompted, change the password to learn.
Then, follow these steps:
Download and unzip the Acme R6J9 Implementation project.
curl https://resources.learn.liferay.com/dxp/latest/en/process-automation/workflow/developer-guide/liferay-r6j9.zip -Ounzip liferay-r6j9.zipFrom the module root, build and deploy.
./gradlew deploy -Ddeploy.docker.container.id=$(docker ps -lq)tipThis command is the same as copying the deployed jars to /opt/liferay/osgi/modules on the Docker container.
Confirm the deployment in the Liferay Docker container console.
STARTED com.acme.r6j9.impl_1.0.0
For convenience, the activate method of the ConditionEvaluator autoloaded a R6J9 Conditional Approver workflow definition. This code achieved the same thing as navigating to the Workflow Process Builder and uploading a workflow definition. See Uploading a New Workflow Definition.
Test the Condition Evaluator
To use the Acme R6J9 Condition Evaluator, set it for use with Blogs Entries and add a new Blogs Entry with the administrative User.
In the Global Menu’s Applications tab, go to Workflow → Process Builder.
In the Configuration tab, assign the R6J9 Conditional Approver definition to the Blogs Entry Asset Type.
Click Save.
Using the default administrative User Test Test, open the Site menu → Content & Data → Blogs.
Click the Add button (
 ).
).Enter something into the Title and Content fields, then click Submit for Workflow.
Back in the main Blogs view, confirm that the entry is visible and that the status is marked as Approved.
tipIf the status initially shows
Pending, refresh the page.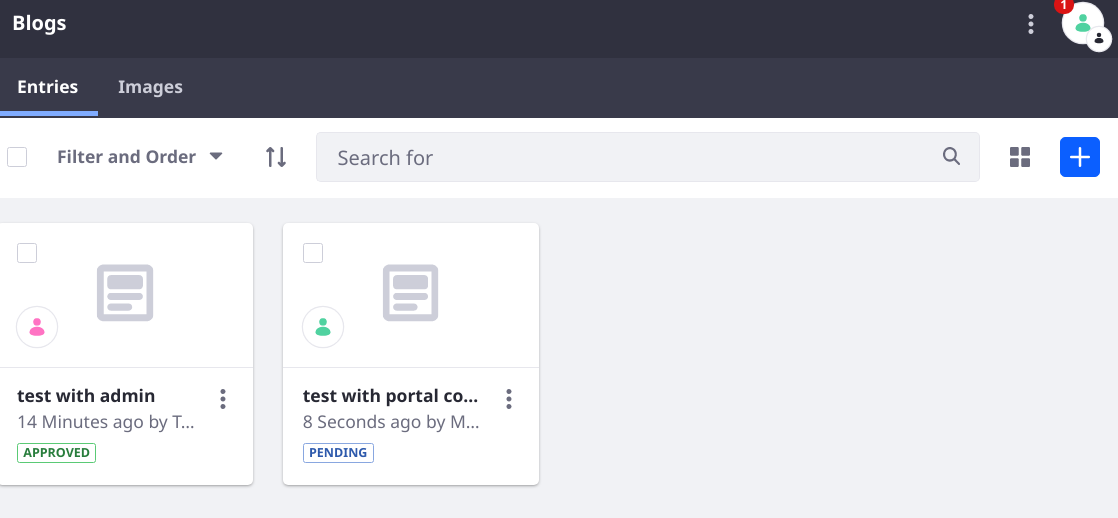
If you test with the Single Approver definition or with another, non-administrative User, you can see that the Blogs Entry is added with the status Pending.
Understanding the R6J9 Condition Evaluator
The Acme R6J9 Implementation project contains a condition evaluator for triggering the approve transition if the workflow user has the Administrator Role. It contains a single class: R6J9ConditionEvaluator.
In addition to the condition evaluator the project includes and auto-loads a workflow definition called the R6J9 Conditional Approver, which uses the condition evaluator.
A condition evaluator does not change the status of the asset being sent to the workflow. It merely provides a convenient way to execute a transition. If changing the workflow status is required, call the WorkflowStatusManagerUtil class’s updateStatus method. The approved state node of the definition sets the status to approved:
<state>
	<name>approved</name>
	<actions>
		<action>
			<name>approve</name>
			<script>
				<![CDATA[
					import com.liferay.portal.kernel.workflow.WorkflowConstants;
					import com.liferay.portal.kernel.workflow.WorkflowStatusManagerUtil;

					WorkflowStatusManagerUtil.updateStatus(WorkflowConstants.getLabelStatus("approved"), workflowContext);
				]]>
			</script>
			<script-language>groovy</script-language>
			<execution-type>onEntry</execution-type>
		</action>
	</actions>
</state>
Implementing a ConditionEvaluator
The condition evaluator class implements the com.liferay.portal.workflow.kaleo.runtime.condition.ConditionEvaluator interface, overriding its single evaluate method. Set the scripting.language=java component property.
@Component(
	property = "scripting.language=java", service = ConditionEvaluator.class
)
public class R6J9ConditionEvaluator implements ConditionEvaluator {
The evaluate method must return a valid transition name so that when called in the workflow definition, the workflow can proceed to the proper node via the transition.
The evaluate method takes two parameters, a KaleoCondition and an ExecutionContext. Because the workflow engine is responsible for calling the condition evaluator in the workflow process, your code isn’t responsible for instantiating and constructing these objects. However, you can obtain useful information from them. For example, the R6J9 Condition Evaluator retrieves the workflowContext (of the type Map) and the serviceContext (of the type ServiceContext) from the ExecutionContext:
Map<String, Serializable> workflowContext =
	executionContext.getWorkflowContext();
ServiceContext serviceContext = executionContext.getServiceContext();
The workflowContext is used to retrieve the workflow User’s ID, and the serviceContext is used to retrieve the Virtual Instance’s ID (the companyId). Both are needed to check whether the User has the Role Administrator; the asset is auto-approved (sent along the transition named approve) by the workflow if the User has the Administrator Role. Otherwise, it executes the review transition.
if (_userLocalService.hasRoleUser(
		serviceContext.getCompanyId(), RoleConstants.ADMINISTRATOR,
		userId, false)) {

	return "approve";
}

return "review";
Calling the ConditionEvaluator in the Workflow Definition
The R6J9 Conditional Approver workflow definition that was auto-loaded by the Acme R6J9 Implementation project is nearly identical to the Single Approver definition that ships with Liferay DXP/Portal. The first difference is in the created state node. The Single Approver definition executes the review transition always, but the R6J9 Conditional Approver executes a check-role transition. The main difference is an addition identically named condition node. The condition node then relies on the R6J9ConditionEvaluator to execute the condition logic.
<condition>
	<name>check-role</name>
	<script>
		<![CDATA[com.acme.r6j9.internal.kaleo.runtime.condition.R6J9ConditionEvaluator]]>
	</script>
	<script-language>java</script-language>
	<transitions>
		<transition>
			<name>review</name>
			<target>review</target>
		</transition>
		<transition>
			<name>approve</name>
			<target>approved</target>
		</transition>
	</transitions>
</condition>
Note that the approved and review transitions are added as valid targets of the condition node. Make sure any transitions used in the ConditionEvaluator are included as valid transitions from the condition node where it’s called.