Configuring Cluster Link
Enabling Cluster Link activates distributed caching. The cache is distributed across multiple Liferay DXP nodes running concurrently. Cluster Link uses Ehcache replication. The Ehcache global settings are in the portal.properties file.
By default Liferay does not copy cached entities between nodes. If an entity is deleted or changed, for example, Cluster Link sends a remove message to the other nodes to invalidate this entity in their local caches. Requesting that entity on another node results in a cache miss; the entity is then retrieved from the database and put into the local cache. Entities added to one node’s local cache are not copied to local caches of the other nodes. An attempt to retrieve a new entity on a node which doesn’t have that entity cached results in a cache miss. The miss triggers the node to retrieve the entity from the database and store it in its local cache.
Clustering in DXP may be configured in different ways depending on your network and the location of your cluster nodes. Start with enabling Cluster Link.
Enabling Cluster Link
To enable Cluster Link, add this Portal Property to a portal-ext.properties file:
cluster.link.enabled=true
The Cluster Link Portal Properties provide a default configuration that you can override to fit your needs.
Many of the defaults use localhost, instead of a real address. In some configurations, however, localhost is bound to the internal loopback network (127.0.0.1 or ::1), rather than the host’s real address. If you still need this configuration, you can make DXP auto detect the real address with this property:
cluster.link.autodetect.address=www.google.com:80
Set it to connect to some other host that’s contactable by your server. By default, it points to Google, but this may not work if your server is behind a firewall. If you use each host’s real address, you don’t need to set the auto-detect address.
Cluster Link depends on JGroups and provides an API for nodes to communicate. It can:
- Send messages to all nodes in a cluster
- Send messages to a specific node
- Invoke methods and retrieve values from all, some, or specific nodes
- Detect membership and notify when nodes join or leave
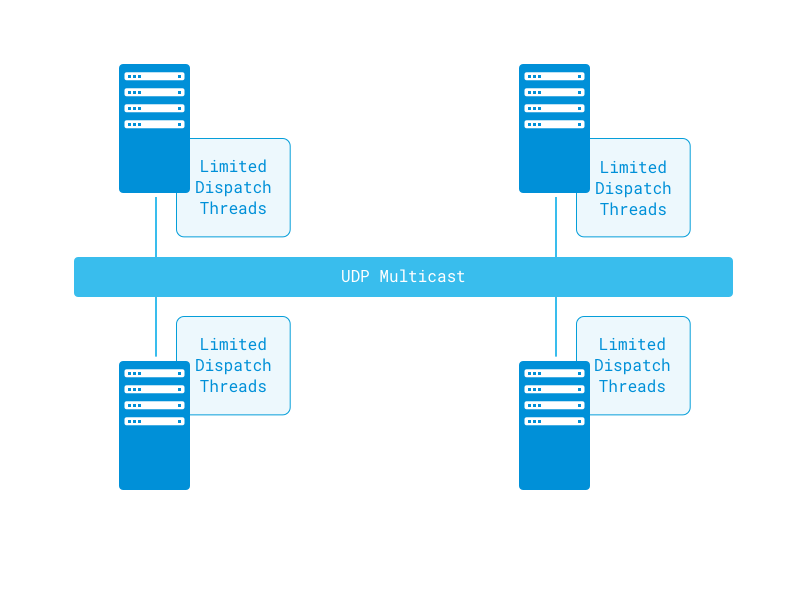
Cluster Link contains an enhanced algorithm that provides one-to-many type communication between the nodes. This is implemented by default with JGroups’s UDP multicast, but unicast and TCP are also available.
Configuring Cluster Link
When you enable Cluster Link, DXP’s default clustering configuration is enabled. This configuration defines IP multicast over UDP. If you cannot use multicast for your own nodes (for example, because they are separated geographically or by a firewall), then you can instead configure a unicast implementation. See Configuring Unicast Over TCP for more information.
Using Multicast Over UDP
DXP uses two groups of channels from JGroups to implement multicast over UDP: a control group and a transport group. If you want to customize the channel properties, you can do so by adding the following Portal Properties to portal-ext.properties:
cluster.link.channel.name.control=[your control channel name]
cluster.link.channel.properties.control=[your control channel properties]
Please see JGroups’s documentation for channel properties. The default configuration sets many properties whose settings are discussed there.
Multicast broadcasts to all devices on the network. Clustered environments on the same network communicate with each other by default. Messages and information (e.g., scheduled tasks) sent between them can lead to unintended consequences. Isolate such cluster environments by either separating them logically or physically on the network, or by configuring each cluster’s portal-ext.properties to use different sets of multicast group address and port values.
JGroups sets a bind address automatically, using localhost by default. In some configurations, however, localhost is bound to the internal loopback network (127.0.0.1 or ::1), rather than the host’s real address. As long as DXP’s cluster.link.autodetect.address Portal Property points to a server that’s contactable, DXP uses that server to automatically detect your host’s real address. Here’s the default setting:
cluster.link.autodetect.address=www.google.com:80
Contacting Google may not work if your server is behind a firewall.
An alternative to detecting the host address automatically for the bind address, you can set the bind address manually in your portal-ext.properties file.
Disable address auto-detection by setting the
cluster.link.autodetect.addressproperty to an empty value:cluster.link.autodetect.address=Set the following properties to your host’s IP address:
cluster.link.bind.addr["cluster-link-control"]=[place your IP address or host name here]
cluster.link.bind.addr["cluster-link-udp"]=[place your IP address or host name here]
Your network configuration may preclude the use of multicast over TCP, see Configuring Unicast over TCP for information for those situations. Note that these methods are all provided by JGroups.
Conclusion
Once you’ve configured your cluster, you can start it. A log file message shows your cluster’s name (e.g., cluster=liferay-channel-control):
-------------------------------------------------------------------
GMS: address=oz-52865, cluster=liferay-channel-control, physical address=192.168.1.10:50643
-------------------------------------------------------------------
Congratulations! Your cluster is using Cluster Link.
What’s Next
It’s best to test your DXP cluster under load and investigate optimizing your system. Consider the entities used most on your site and adjust their cache settings appropriately. For information on configuring cache, please see Cache Configuration.